
Cyclinks: Build a Linktree Clone on Cyclic
Cyclinks for everyone!
Why use a pre-built link sharing service and share your data when you can build your own? In this tutorial, we'll use Create React App, TailwindCSS, and Cyclic.sh to help you set up your very own link site.
Wanna fast forward and just use the template? Check out the Cyclinks repo here.
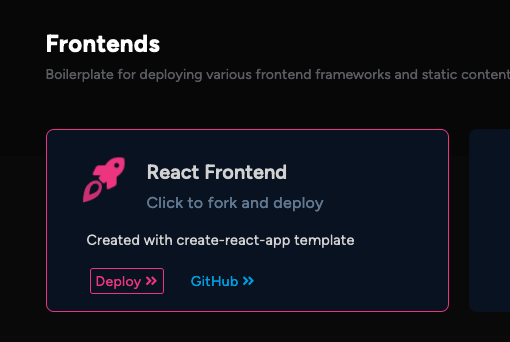
First things first, let's kick it off by creating a new React app with Create React App. You can do that in a fresh repo locally by following the Create React App documentation but we've made it even easier by setting up a starter in Cyclic.sh which you can fork from our Start Template tab.
If you want, you can fork the starter right here:

Once you have forked and cloned this repo locally, take a second to npm install to install the included dependencies that come with the starter.
The next step is to install TailwindCSS. Don't be intimidated by Tailwind, it just takes a couple steps to get it working.
First, npm install -D tailwindcss and then run the command npx tailwind init to create a 'tailwind.config.js' file.
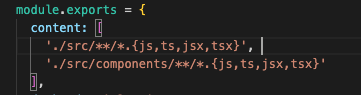
In the Tailwind config file, you need to give it access to the content you would like Tailwind to be able to affect. Under content add './src/**/*.{js,ts,jsx,tsx}', and './src/components/**/*.{js,ts,jsx,tsx}'
There's so much more you can add to the Tailwind config file, but for now we'll head over to 'App.css' and add the following bottom of the file:
@tailwind base;
@tailwind components;
@tailwind utilities;
This adds the Tailwind to your CSS so that all the layers are able to access Tailwind's capabilities. Nice! Let's move on to the application.
First things first, if you want to see what Create React App looks like fresh out the gate, use the command npm run dev. That should spin up a version of the template on "https://localhost:3000" and you can check it out.
If you run the application right, now we'll see a standard template from Create React App. There are a few things built in that we can keep, other things we'll modify, the rest can be ignored or trashed.
The public folder holds a lot of the information that indicates what the website is to the world, such as the favicon, index.html containing the “root”, and a manifest with metadata.
I swapped the React favicon for a Cyclic Favicon and updated the manifest.json to reflect what I'd like the site to be called: CycLinks… obviously. And so it immediately reflects the change in the browser tab.

Cool, so how do we get these sick links set up?
Well currently, everything that is being rendered is entered directly into the App.js file. We need to make some components that will be imported into that file and those components will compose our links page. Alright? Sweet.
Inside the src folder, add a components folder. Inside the component folder, add a file for the following:
- Header.js
- Cyclinks.js (you can call it Links.js if you want)
- Footer.js
First, we'll go to the 'Header.js' file. If you want your headshot or a profile pic in the header, you'll want to add that to the 'src' folder. Once you've done that you can import it at the top of the file like so:
import profilepicrs from '../profilepicrs.jpg'
We'll then create the Header function that will be exported. You can use the styling I've provided with TailwindCSS below. Just a few notes:
- In React, remember to use
classNameinstead ofclass. - The
imgtag will style the image. - The
h1tag is for your name or alias, I have it set up to be animated and pulse between two colors of blue, but that's easily changed to a different color or made static. - The
ptag is for your title or tagline. - For more information on how to style items in TailwindCSS be sure to check out their style guide.
Get your Header component going on:
function Header() {
    return (
      <header className="container flex text-center mx-auto py-10">
        <div className="md:w-4/6 mx-auto">
          <img format="webp" loading="lazy" src={profilepicrs} className="h-24 rounded-full mx-auto mb-5 border-white border-double" />
          <h1 className="text-xl font-bold text-blue-400 dark:text-blue-200 font-semibold animate-pulse">My Name</h1>
          <p className='text-white'>My Cool Tagline</p>
        </div>
      </header>
    );
  }

  export default Header;
The next part is the meat of the project, it's where we get our LINKS!!
First, you need to add a file called cyclinks.json (you could also just call it links.json, but what's the fun in that?). You'll need to create your json with the following format:
[
 {
 “title": "My link”,
 "url": "https://link.com"
 "emoji": "😎"
}
]
You can add as many links as you want, just remember to add a comma between the blocks. If you want to leave the emoji out, just leave the quotes blank.
Great! Once you have your link data added in, save the json file and let's set up the Cyclinks.js component.
If you've worked with React before, you know you'll need to import the json file:
import links from '../Cyclinks.json'
Then like in the Header.js, we'll need to create our component function.
The basic functionality of this code is that we're mapping through the list of links in your Cyclinks.json and adding Tailwind styling to them so they arrange themselves in a nice unordered list on our page.
function LinkList() {
  return (
    <main className="flex px-3 sm:px-0">
      <ul className="w-full md:w-4/5 lg:w-3/6 mx-auto">
        {links.map(link => (
          <li className="mb-4" key={link.title}>
            <a
              className="relative transition duration-200 font-bold bg-blue-400 border-blue-400 border-2 hover:bg-transparent py-4 w-100 block text-center text-white hover:text-blue-400 rounded-lg pl-12 md:px-12"
              href={link.url}
              alt={link.title}
              target="_blank"
              rel="noopener"
            >
              <span className="text-3xl absolute left-0 top-0 bottom-0 pl-3 flex items-center">{link.emoji}</span>
              <span>{link.title}</span>
            </a>
          </li>
        ))}
      </ul>
    </main>
  )
}

export default LinkList;
Finally, we'll create a Footer component. It's not even necessary, but it looks nice to have something at the bottom. This is where we've indicated that we used React to make this project with the CycLinks repo, but you can change it to a copyright or a quote of your choosing.
Pro tip, if you want to get free credit on Cyclic, you could even drop a “Deployed on Cyclic” link here and use your referral link. Every little bit counts, right?
Anyways, the footer doesn't need to import anything, it's just a component function, styled with Tailwind. The only special effect I used here was the same animation I used to make my name glow.
function Footer() {
  return (
    <footer className="px-3 sm:px-0">
      <div className="container text-center mx-auto">
        <div className="md:w-4/6 mx-auto">
        <p className='py-4 text-center text-xs sm:text-sm font-light text-white'>
        Created with{' '}
        <span className='text-green-600 dark:text-green-400 font-semibold animate-pulse'>
          <a href="https://github.com/facebook/create-react-app">React</a>
        </span>{' '}
        from{' '}
        <span className='text-blue-500 dark:text-blue-300 font-semibold animate-pulse'>
          <a href="https://github.com/rachelschipull/cyclinks">CycLinks</a>
        </span>
      </p>
        </div>
      </div>
    </footer>
  );
}

export default Footer;
Nice so let's add these components to the App.js and see what it looks like so far!
In App.js, you'll need to make sure import the following:
import Header from './components/Header'
import Cyclinks from './components/Cyclinks'
import Footer from './components/Footer'
Then within the App function, you'll need to replace the Create React App template with our three components inside the top level <div>.
function App() {
  return (
    <div className="App">
      <Header />
      <Cyclinks />
      <Footer />
    </div>
  );
}
Don't take out the export default App; at the bottom! That's important.
Ok, let's see how it looks.
Enter npm run dev in the terminal and you should see something to the effect of:
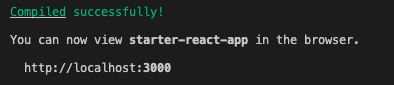
Head to 'https://localhost:3000' and take a look.
If your project did not compile successfully, you will get pretty descriptive error messages. Take a look at the file and line number to see if you misspelled a variable or forgot to update something from my code to yours.
So this is our app, but we can make it better.
I decided to add a background image of stars (because why not). That update went in the 'App.css', as would any other specific changes to a part of the CSS that are outside of Tailwind.
  text-align: center;
  background-image: url(./background2.jpg);
}
Because it was added to the App, I needed to adjust the style in the App.js as well so that the image wasn't cut off in different viewports. I accomplished this by adding a style tag to the <div> encompassing all the components.
<div className="App" style={{height:'100vh'}}>
Ahhh, the finished project:

There are a few optimizations I'd like to create for this project. For example:
- A parallax effect for the background image.
- Dropdown previews for the links
- A shimmering hover effect
- A variety of link colors
- Using Font Awesome icons instead of or in additiona to emoji
What ideas do you have for making Cyclinks cooler? Let me know or submit a PR: https://github.com/cyclic-software/cyclinks. Have ideas for other demos or tutorials you want to see, drop us a line in Discord.
Get started with Cyclinks right now:
Subscribe to posts
Enter your email If you would like to get an email the next time we post.
We post about ~1-2x per month, and up to once a month about company news.
Launch a hello world
Fork and deploy a hello world project onto Cyclic faster than it has taken to read this page. Experience the power.
Deploy on Cyclic 🚀