I Made The Same App 3 Times in 3 Different Frameworks... Here's What I Learned.
Angular, Svelte, Solid, React, Vue — there are so many frameworks out there. And you probably dealt with the "framework dilemma" at some point in your career.
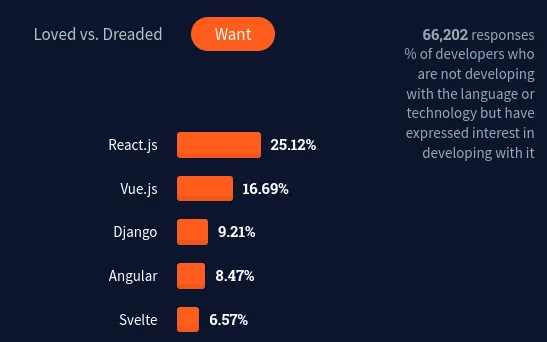
Some of us pursue React, the most popular framework. And that's completely understandable, because it being famous also implies that it's the most demanded skill in the job market.
Next up is Vue, and its second position in the popularity spectrum. Some people prefer Vue for the fact that it's so lightweight and yet so scalable, and others love its simplicity and similarity to other frameworks.
Let's take a leap of faith and change our selection criteria from popularity to likability.
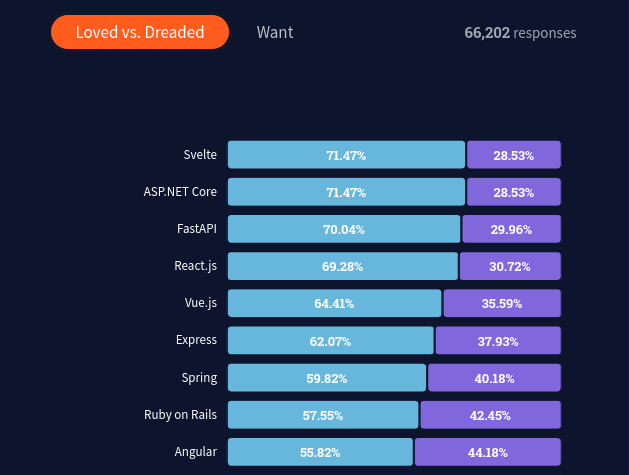
Svelte is the most loved framework, and for good reason. Svelte places strong emphasis on developer happiness because it's so easy to pick up and has a compiler that is more efficient than its peers.
I always wondered how different it would be to build the same app with the same features, but in 3 different frameworks. For each one, I want to answer the following questions:
- How many errors will I encounter?
- How much code is there to write?
- How long does it take to build?
We'll be exploring each of the aforementioned frameworks in its own piece, as part of a four-article series.
We'll build a website for publicly sharing short-messages, called "ithink". It's like Twitter, but with no accounts and you can't delete what you post.
See the Pen It's Twitter, but you can't delete. by Eluda (@eludapens) on CodePen.
But first, we need an API
If you play around with the CodePen above, you'll quickly realize that the database is not fake.
We actually have a back-end side of our application: it handles the storing and retrieving of simple text data. It's also built on Amazon's S3 object storage service.
A developer would normally spend hours and hours setting-up a database like this, and it's not free either.
Luckily for us, we get a free instance of the AWS S3 Storage when we use Cyclic. No credit card is required.

Vue, the lightweight framework
Let's start by exploring the wonders of Vue, the framework that claims itself to be one of the most performant frontend frameworks.
Creating a new project
It's no secret that setup is one of the most important stages in a project's lifecycle. It's the very first step in the journey that transforms an idea into a real-life, working application that runs on a modern computer.
We can all agree that creating a boilerplate from scratch is exhausting. I mean, think about all the folders, files, and code that you'd need to keep repeating, forever. No one wants to do all that work!
Luckily, Vue does all the work for us when we run the following command:
npm init vue@latest
It will ask you a bunch of questions so you can create the optimal setup that best fits your project. So go ahead, and accept/reject the following questions:
- Project name: ithink
- TypeScript? No
- JSX Support? No
- Vue Router? No
- Pinia? Yes
- Vitest? No
- Cypress? No
- ESLint? No
- Prettier? No
We'll see what each of these means throughout this article.
Next up is installation. This time, you don't have to do anything. Just kick-back, relax, and wait for yarn to do its work! (of course, you can also use npm if that's your preference)
cd ithink
yarn install # or npm install
See the Pen vue-0 by Eluda (@eludapens) on CodePen.
This command will create a dead-simple boilerplate which comes with some defaults. Go ahead and run yarn dev or npm run dev and open up http://localhost:3000 in your browser. It's already looking great, isn't it?
You'll see a semi-usable application describing Vue, with the addition of some links to its inner-workings.
Unfortunately, most of this stuff is useless to us. Therefore, we'll erase most of it so that we can continue along this guide:
Take some time to observe the folder structure. Notice the emphasis that it places on decoupling. Everything is where it's supposed to be, making it a very clean and elegant architecture to work on.
tree .
├── index.html
├── package.json
├── public
│   └── favicon.ico
├── README.md
├── src
│   ├── App.vue
│   ├── components
│   ├── index.css
│   ├── main.js
│   └── stores
├── vite.config.js
└── yarn.lock
Don't worry if this looks intimidating. We'll cover all of it throughout this document.
Configuring SEO
You might have noticed that the title of our document is "Vite App", with no immediately obvious way of changing it.
It turns out that this is a great opportunity for us to delve into the first element: index.html. You've undoubtedly already seen this filename in a billion other places, but probably not in the context of Vue.
So let's dive into index.html, and update some defaults:
<!DOCTYPE html>
<html lang="en">
  <head>
    <meta charset="UTF-8" />
    <link rel="icon" href="/favicon.ico" />
    <meta name="viewport" content="width=device-width, initial-scale=1.0" />
    - <title>Vite App</title>
    + <title>ithink</title>
    + <meta name="description" content="Global online messaging, void of any borders." />
  </head>
  <body>
    <div id="app"></div>
    <script type="module" src="/src/main.js"></script>
  </body>
</html>
We changed the title and added a description. Hence, quite simply, index.html is the entry-point to our application. It's where you modify the <head> meta-tags, add class-names to the top-most elements such as <body> and <html>, and change the language of your website from English ("en") to say, French ("fr").
It's also impossible to avoid speaking about <div id="app"></div>. As we'll see in an upcoming section, this is where all-things-Vue are injected. So let's keep on exploring!
Changing the body color
See the Pen vue-1 by Eluda (@eludapens) on CodePen.
The website we're building has an overall dark theme, meaning that the <body> color should be changed from white to dark.
After configuring TailwindCSS, we'll start adding these changes to our document.
You must've already created a src/index.css file during your Tailwind configuration, and imported it from src/main.js. So, let's add our custom styles:
/* index.css */
@tailwind base;
@tailwind utilities;
@tailwind components;

body {
  @apply bg-stone-900;
}
As you can see, we're using the @apply directive to apply the bg-stone-900 utility to the body. If you're not very Tailwind-savvy, bg-stone-900 is equivalent to the following CSS declaration:
body {
    background: #1c1917;
}
Adding a header
See the Pen vue-2 by Eluda (@eludapens) on CodePen.
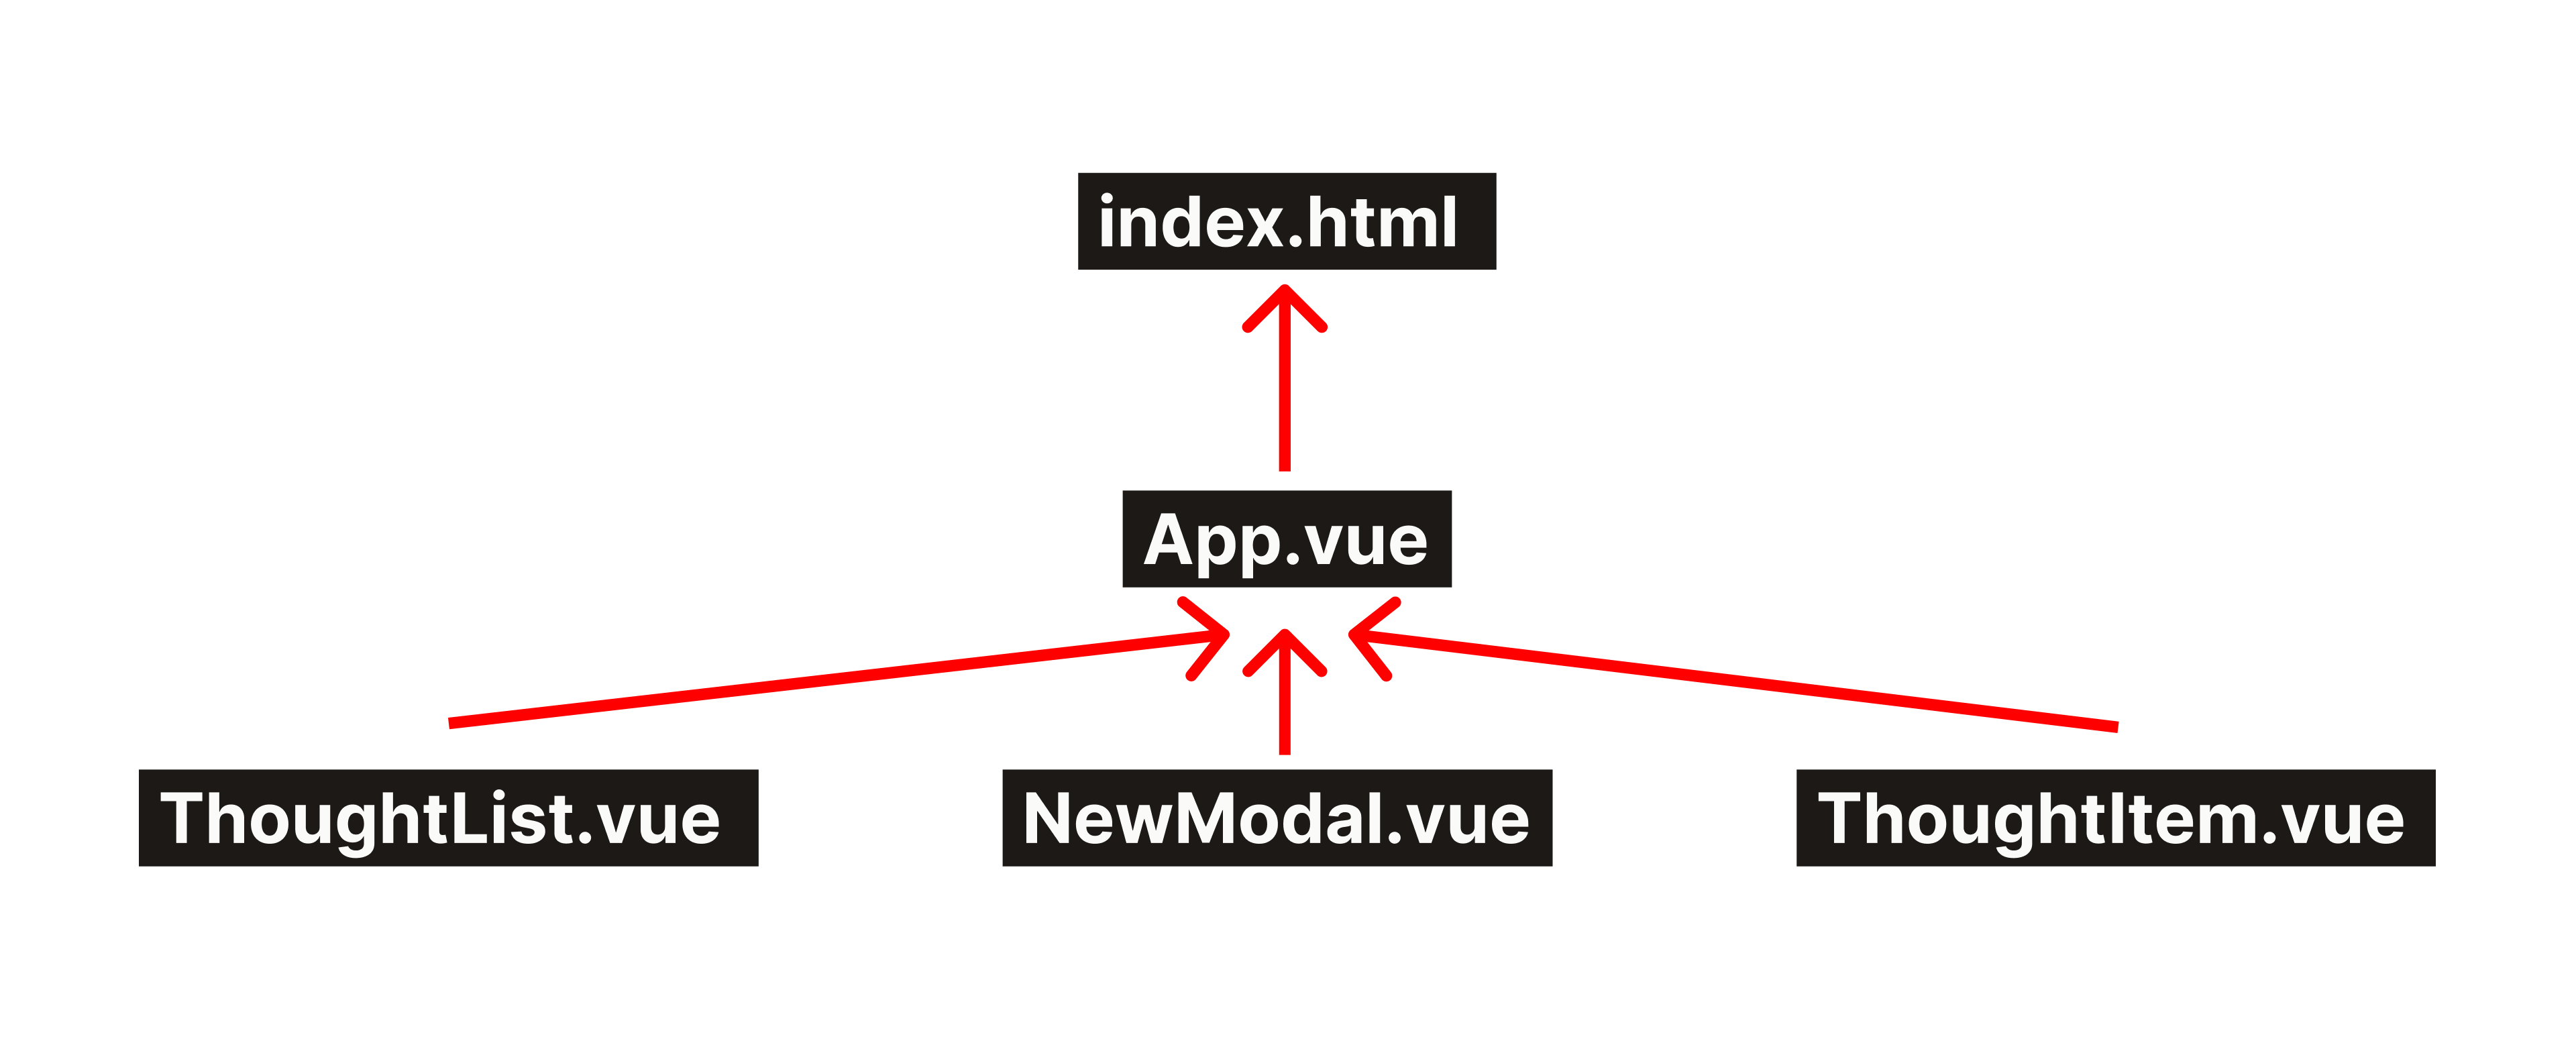
It's time to delve into our second-most element: App.vue. It's the top-most component of our application.
Whatever you put inside this file will go straight into <div id="app"></div>. Remember it? We mentioned it in the last paragraph of the section that covered index.html. See how it all fits together? Magical!
And with all that said, let's implement our overly-simplistic header:
<template>
    <!-- App.vue -->
    <header>
        <h1>ithink</h1>
        <button>New</button>
    </header>
</template>
As you can see, we kept it pretty simply.
Hey! I hid the Tailwind class-names from the code snipped above. Browse our code repository to see the full code.
Ahem, let's address the elephant in the room. What the heck is <template>?
- Before we get into that, let me explain a fundamental concept to you.. Web components!
- Web components give developers the ability to create their own tags:
<profile-card>,<emoji>,<close-button>,<code-editor>- It's like magic! You get to encapsulate your own HTML, CSS, and JavaScript. Web components are an elegant way to create user-interfaces that resemble native apps. They're the future of the web.
- If this sounds cool to you, you're probably wondering how to create these things.
So let me introduce… Single File Components! (SFCs)
<script setup>
    // Javascript here
</script>

<template>
    <!-- HTML here -->
</template>

<style scoped>
    /* CSS here */
</style>
As you can see, SFCs split a component's design into three logical parts, and they can come in any order:
- JavaScript logic: (
<script setup>) The brains of your component. Handles state, events, networking, etc… - HTML document: (
<template>) The semantics of your component. - CSS declarations: (
<style scoped>) The style of your component.
Pretty neat, huh?
Listening to click events
As it currently stands, the "new" button doesn't do anything, and no one wants a useless button.
So let's change that! We must listen to a click event, and in Vue, events work like this:
<script setup>
    function openModal() {
        // TODO
        alert('button clicked!')
    }
</script>
<template>
    <button @click="openModal">New</button>
</template>
We'll come back to the openModal function later, when we actually create the modal!
Creating a modal component
It's time to put the src/components folder to good use. This is where we'll be housing all our custom components.
See the Pen vue-3 by Eluda (@eludapens) on CodePen.
What you can see in the image above is the "New Modal" component, written into the NewModal.vue file.
Create a new file at src/components/NewModal.vue. Fill it up with the usual SFC boilerplate:
<script setup>
    // NewModal.vue
</script>

<template>
</template>

<style scoped>
</style>
Let's get the markup out of the way: (remember to use the right semantics)
<template>
  <div>
    <dialog open>
      <main>
        <form method="dialog">
            <label for="content">Content</label>
            <textarea id="content"></textarea>

            <button value="cancel">Cancel</button>
            <button value="default">Post</button>
        </form>
      </main>
      <footer>
        <p>Whatever you write will become public.</p>
      </footer>
    </dialog>
  </div>
</template>
Markup alone is not very useful without the JavaScript logic. Let's attach event handlers to our button elements:
<script setup>
    function close() {
        // TODO
    }
</script>

<template>
    ...
    <button value="cancel" @click="close">Cancel</button>
    <button value="default">Post</button>
    ...
</template>
Okay, this is great! But notice that when you click on "post", the page reloads. This is the default behavior of HTML forms.
Normally, we'd change that by calling e.preventDefault. But Vue focuses so much on simplicity that there's a super-convenient shortcut:
<script setup>
    function submit() {
        // TODO
    }
</script>

<template>
    ...
    <form method="dialog" @submit.prevent="submit">
        ...
    </form>
    ...
</template>
Would you look at that! We're able to shorten e.preventDefault() to @submit.prevent. Now, we don't even need to consider the Event object anymore!
Tracking a loading state
The user should know when their application is loading, whether it's posting new text to the server or just retrieving it.
Let's create a variable that tracks when our component is sending/receiving data to/from the server. We're gonna be using reactive variables.
What is a reactive variable?
- Consider the following scenario:
let a = 4
document.getElementById('container').textContent = a // <p id="container">4</p>
- Say that we updated the value in a to 5. One thing we know for sure is that the
<p>element won't change. It will always say "4", unless we explicitly change it. - Well, we don't have to! With reactivity, the DOM is automatically updated once the related variable is mutated.
- In Vue, reactive variables are created with ref, a function that takes any value and makes it reactive.
import { ref } from 'vue'
const a = ref(4)
a.value = 5
- Notice the addition of .value. It's important, because if we did a = 5 we'd completely taking away the reactivity of the variable.
- Also, it doesn't matter that a is a constant variable, because we're only assigning to its .value property.
- Now look at the HTML:
<template>
<p>{{ a }}</p>
</template>
- Vue will replace {{ a }} with its value: a.value, and the double-brackets are not optional.
Okay, let's head right back into the submit logic. We'll create a new isLoading reactive variable, which will indicate when our app is in-contact with the server.
import { ref } from 'vue'

const isLoading = ref(false)
async function submit() {
    isLoading.value = true

    // TODO: send data to server

    isLoading.value = false
}
Getting user input from form elements
Our "new modal" component can't exist without the <textarea> form element. But this raises an important question: how do we keep the javascript code in-sync with the DOM content?
In a nutshell, Vue has a shortcut way of dealing with form elements. And it's quite convenient!
As you can see, message is a reactive variable, so whenever the user types something into textarea, message will be instantly updated. That's the magic of v-model!
Hey! You may be getting tired from typing .value all the time. Thankfully, Vue has plans to change that.
Making the modal inert while loading
See the Pen vue-4 by Eluda (@eludapens) on CodePen.
When our app is loading (which is tracked by the isLoading variable that we saw in a previous section), we should disable interaction with it.
This requires us getting access to a DOM element in JavaScript. The pure way of doing that is with body.querySelector(), but this approach is non-reactive. Plus, there's a simpler alternative offered by Vue:
<script setup>
    import { ref } from 'vue'
    const container = ref(null)
</script>

<template>
    <div ref="container"></div>
</template>
These are called template refs! And although it says null, Vue will fill container with the DOM element
With this in hand, we can make our component inert while it's loading:
<script setup>
    import { ref } from 'vue'
    const container = ref(null)

    async function submit() {
        isLoading.value = true;
        dialog.value.setAttribute("inert", true);

        // TODO: send data to server

        dialog.value.removeAttribute("inert");
        isLoading.value = false;
    }
</script>

<template>
    <div ref="container"></div>
</template>

<style scoped>
dialog[inert] {
  @apply filter brightness-90;
}
</style>
Hey! While there's a simpler way to achieve the above (<div :inert="isLoading">), I just had to create an opportunity to teach you about template refs, which are a pretty important feature in VueJS.
Automatically focusing the <textarea>
See the Pen vue-5 by Eluda (@eludapens) on CodePen.
When the user opens the NewModal component, we know that their objective is to input into the <textarea>. So, wouldn't it be convenient to save them the hassle of moving the cursor towards that form element?
Let's implement this feature! Counter-intuitively, we can't do this:
<h1>blah blah</h1>
<script setup>
    import { ref } from 'vue'
    const textarea = ref(null)

    textarea.value.focus() // this is WRONG!
</script>

<template>
    <textarea ref="textarea"></textarea>
</template>
The above code won't work, because it's the same as saying null.focus().
So, how do we tell Vue to only focus the textarea once it's available? The answer lies in lifecycle hooks.

We want to utilize the "mounted" hook, which is called right after the component is added to the DOM. That's when the <textarea> is shown, meaning that it's not null:
import { onMounted } from 'vue'

onMounted(() => {
    textarea.value.focus() // CORRECT! :)
})
There are many more lifecycle hooks, and we usually use most of them. However, in our application, the "mounted" hook was more than enough. But just keep one thing in mind, you'll see this concept again and again in every framework.
Closing the modal when clicked outside
See the Pen vue-6 by Eluda (@eludapens) on CodePen.
It's a pretty common behavior in every modal to close it once the user clicks outside.
In this step, we'll take a HUGE shortcut. Instead of manually implementing this behavior, we shall use another library to do it for us.
The Vue community is humongous and infinitely helpful, so it's not a surprise to find a library like @vueuse: over 200 useful methods that cover almost every possible use–case.
Our interest lies in the [onClickOutside event](https://vueuse.org/core/onClickOutside/), which is triggered every time the user clicks outside a certain DOM element.
After setting up @vueuse, let's add it to our component:
<script setup>
    import { ref } from 'vue'
    import { onClickOutside } from '@vueuse/core'

    // Close dialog when clicked outside
    const container = ref(null)
    onClickOutside(container, close)

    function close() {
        // TODO
    }
</script>

<template>
    <dialog ref="container">...</dialog>
</template>
Fascinating how in one line of code, we're able to implement such a seemingly complicating feature!
Closing the modal
The modal has no way of telling whether its opened or closed, as only its parent — App.vue — knows such information.
But there's one thing we know to be true, and it's that the modal knows when it should be closed:
- user clicked outside,
- user submitted,
- user canceled.
Therefore, we need a way for the child — NewModal — to communicate with its parent, App. And the solution is quite simple: Events!
With Vue, it's super-simple to define our own events, while dictating when they should be emitted, using our own rules.
const emit = defineEmits(['close'])

function close() {
    emit('close')
}
Henceforth, whenever the modal needs to be closed, we emit the event "close" up into its parent.
Hey! Notice how we didn't import defineEmits. That's because it's a compiler macro, so it's always there by default.
Using our custom component
Up until now, you couldn't see NewModal, because it hasn't been added to App.vue yet. So, let's change that:
<script setup>
    import NewModal from './components/NewModal.vue'
</script>

<template>
    <NewModal />
</template>
With the code snippet above, the modal will always be open. So, let's add some toggle magic:
<script setup>
    import NewModal from './components/NewModal.vue'
    import { ref } from 'vue'

    const isModalOpen = ref(false)

    function openModal() {
        isModalOpen.value = true
    }
    function closeModal() {
        isModalOpen.value = false
    }
</script>

<template>
    <NewModal v-if="isModalOpen" />
</template>
We took advantage of v-if to show/hide the modal.
And now we're done with the NewModal component. Pretty simple, huh?
Creating a dynamic list of DOM elements
See the Pen vue-7 by Eluda (@eludapens) on CodePen.
It's time to delve into a new component, ThoughtList. This one will display a list of items, and we don't know the length of that list before-hand.
Let's create a new file at src/ThoughtList.vue. In Vue, here's how we repeat an element:
<script setup>
    import { ref } from 'vue'
    const items = ref(['hello', 'world!'])
</script>

<template>
    <ul>
        <li v-for="item in items">
            <p>{{ item }}</p>
        </li>
    </ul>
</template>
Surprisingly simple! It might be useful to split this component into two: ThoughtList.vue and ThoughtItem.vue.
So, we'll change src/ThoughtList.vue to:
<script setup>
    import { ref } from 'vue'
    import ThoughtItem from './ThoughtItem.vue'

    const items = ref(['hello', 'world!'])
</script>

<template>
    <ul>
        <li v-for="item in items">
            <ThoughtItem />
        </li>
    </ul>
</template>
and the new ThoughtItem.vue will contain:
<template>
  <p>
    Hello world!
  </p>
</template>
And of course, don't forget to add it to App.vue:
<script setup>
import ThoughtList from "./components/ThoughtList.vue";
</script>

<template>
  <main>
    <ThoughtList />
  </main>
</template>
Passing text from parent to child
We've seen how to trigger events from child to parent, and now, it's time to flip that formula around.
Currently, our ThoughtItem displays the same text: "Hello world!"
But we want to show real data, which is held by the parent — ThoughtList — in the items reactive variable.
The solution to this problem is called Props (properties). They're like HTML attributes, if they could contain anything! (arrays, objects, and even functions!)
So let's make a little change to ThoughtList.vue:
<template>
    <ul>
        <li v-for="item in items">
            <ThoughtItem :message="item" />
        </li>
    </ul>
</template>
Hey! It's important to add the colon : before the prop name. It tells Vue to treat the content between "..." as JavaScript code (the item variable), instead of a String (the text "item").
And now, we can access the text message in ThoughtItem effortlessly:
<script setup>
defineProps({
  message: String, // `message` has type String.
});
</script>

<template>
  <p>
    {{ message }}
  </p>
</template>
Hey! Just like defineEmits, defineProps is a compiler macro and doesn't require importing.
Loading data from the server
Up until now, we only used mock data. So, let's change that! We'll be getting data from an external API.
But first, notice that we'll need to access our API from two separate components: ThoughtList for retrieving all items, and NewModal for adding new items to the list.
This is called a shared-state between multiple components. There's no immediately obvious way of solving this issue, but thankfully, there's an entire library designed just for that, and it's called Pinia.
This is where we'll start working with the stores/ folder. So let's create the src/stores/thoughts.js file.
A store should always resemble this boilerplate, so use it as a starting-point:
// thoughts.js
import { defineStore } from 'pinia'

export default defineStore('thoughts', {
    state: () => ({
        // Reactive variables here
    }),

    actions: {
        // Methods here
    }
})
We created a store with the "thoughts" ID name.
But what is a store, you may ask? It's simply a collection of reactive variables and methods that act on them:
// thoughts.js
import { defineStore } from 'pinia'

export default defineStore('thoughts', {
    state() {
        return {
            reactive_var: 1,
            another_reactive_var: 'awesome!',
            again_another_reactive_var: [0, 2, 4]
        }
    },

    actions: {
        my_method() {
            // We can access all reactive variables here using `this.`
            // NOTE: we don't have to use `.value` here!
            this.reactive_var++
            return this.another_reactive_var * 4.5
        }
    }
})
Notice how we don't have to use .value here. Awesome!
Now, let's create an actually useful store:
// thoughts.js
import { defineStore } from "pinia";

export default defineStore("thoughts", {
  state() {
    return {
      items: [],
    };
  },
  actions: {
    async load() {
      // Fetch data from the Cyclic API
      const res = await fetch("https://ithink-api.cyclic.app/", {
        headers: {
          "Content-Type": "application/json",
        },
      });
      const items = await res.json();

      this.items = items;
    },
    async add(message) {
      // Post data to the Cyclic API
      await fetch("https://ithink-api.cyclic.app/", {
        method: "post",
        headers: {
          "Content-Type": "application/json",
        },
        body: JSON.stringify({
          text: message,
        }),
      });

      this.items.unshift(message);
    },
  },
});
All we did here is declare an items reactive variable that will contain our most important data. We then defined the load method that should be called to load data from the server and assign it to items.
We also defined the add action, which asynchronously sends data to the server and adds it to the items list.
Using real data in our application
See the Pen It's Twitter, but you can't delete. by Eluda (@eludapens) on CodePen.
Let's connect our thoughts store with our application! We'll start with NewModal:
<script setup>
import getThoughtsStore from '../stores/thoughts.js'
const { add: addItem } = getThoughtsStore()
async function submit() {
await addItem(message.value)
close()
}
</script>
We extracted the add function from the store by calling it as a function. Here, we called it getThoughtsStore, which is a convention when using Pinia.
Would you believe me if I told you that was it? Well, I never lie.
Let's move into ThoughtList, which will load data from the server in order to display it.
<script setup>
  import getThoughtsStore from "../stores/thoughts";
  const { load: loadItems } = getThoughtsStore();

  await loadItems();
</script>
And we also have to access the items reactive variable straight from the store. So let's follow the same pattern here:
const { items } = getThoughtsStore(); // this is WRONG
But counter-intuitively, this breaks the reactivity of the variable. Here's the right way of doing this:
import { storeToRefs } from "pinia";
const { items } = storeToRefs(getThoughtsStore()); // CORRECT :)
Perfect!
Notice how in our previous code example, we're using a top-level await to load the data in ThoughtList:
<script setup>
  import getThoughtsStore from "@/stores/thoughts";
  const { load: loadItems } = getThoughtsStore();

  await loadItems();
</script>
Components with top-level awaits are called async components.
If we leave it like this, we're gonna get the following error: (check your devtools console)
Component <Anonymous>: setup function returned a promise, but no <Suspense> boundary was found in the parent component tree. A component with async setup() must be nested in a <Suspense> in order to be rendered.
It's telling us that we should use a component called <Suspense> as a parent to the async component. <Suspense> is a built-in Vue component, so we can use it anywhere in our app. Let's use it in App.vue:
<script setup>
  import ThoughtList from "./components/ThoughtList.vue";
</script>

<template>
  <main>
    <Suspense>
      <ThoughtList />
    </Suspense>
  </main>
</template>
It now works perfectly! Yay!
Adding a loading state to our list
See the Pen It's Twitter, but you can't delete. by Eluda (@eludapens) on CodePen.
Currently, our ThoughtList component will be invisible until data is loaded. That's inconvenient, and makes a great example of bad UX.
Thankfully, since we're already using <Suspense>, we can directly tell it to show something else while its child is loading. Add this to App.vue:
<Suspense>
    <ThoughtList />

    <template #fallback>
        <p>Loading...</p>
    </template>
</Suspense>
As you can see, anything within <template #fallback> will be shown when ThoughtList is loading. Awesome!
But we can get even awesome-r than that. Let's show a loading skeleton!
<Suspense>
    <ThoughtList />

    <template #fallback>
        <div class="flex flex-wrap gap-2">
            <div v-for="i in 15" class="h-16 w-48 animate-pulse rounded bg-stone-50/10"></div>
        </div>
    </template>
</Suspense>
You should know that i in 15 is a shortcut that Vue offers us to loop over the range [1, …, 15]. Super!
And with that done, our app is now complete! Now that wasn't so hard, was it?
Conclusion
We covered a handy amount of Vue features:
- Suspense and async components
- The @vueuse library
- Reactive variables
- Skeleton loading
- Custom events
- Lifecycle hooks
- Template refs
- v-for and v-if
- Pinia
Some of these are common to all web frameworks, while some aren't. We'll compare Vue with the rest of its peers at the end of this series, so I suggest you keep on reading! Trust me, there's a whole lot more to learn! 😄
Subscribe to posts
Enter your email If you would like to get an email the next time we post.
We post about ~1-2x per month, and up to once a month about company news.
Launch a hello world
Fork and deploy a hello world project onto Cyclic faster than it has taken to read this page. Experience the power.
Deploy on Cyclic 🚀